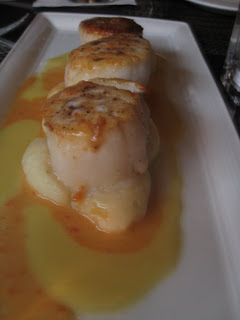
Plans to nosh at Tacos A Go-Go were utterly and deliciously hijacked, and I ended up at Fins instead. Occupying the space Rickshaw's used to be, Fins is a fusion sushi seafood restaurant.
Before I go on, I'll give the full disclaimer that I was with two friends acquainted with the chefs. Now here's the good stuff.
First, the salt and pepper shrimp covered in sauteed chives was killer. Perfectly cooked, and addictively seasoned. Likewise, the calamari was light and crisp, and cornmeal battered fried oysters sizeable and crunchy.
The sushi rolls lacked glitz, but were wonderfully fresh and well balanced in size and flavor. Ditto to the sashimi. Traditional desserts like hot apple cobbler and sour cream chocolate cake seemed like unlikely candidates at a sushi place, but were warm, gooey, and just sweet enough.
Every dish was very thoughtfully prepared, and it was apparent this new restaurant is working towards consistency and getting the balance of flavors and textures just right. Despite my perhaps unfair dining experience, I think it's a safe bet that Fins is worthy of giving it a chance. Sample the non-sushi offerings and let me know how it goes.
Monday, December 21, 2009
Saturday, December 19, 2009
Houston winter FTW
You know what's great about winter in Houston?
 The farmer's markets are unthwarted by silly things like "the cold" or "ice", enabling you to nab the last chocolate croissant from your favorite bread people. (Chocolate croissant to the person who tells me how to rotate this photo.)
 I get to go to Central Market! Though, I suppose you can actually shop there year round...
 You can roll down grassy hills (perhaps the only hill in Houston?) under clear blue skies.
 And best of all, you can enjoy Hank's ice cream in 50 degree weather. These guys do it right with southern flair. Butter pecan, banana pudding, sweet potato pie, and you can even meet Hank. How did I live down the street from this place for years without knowing?? Do yourself a huge service and go out of your way to nab a scoop or two.
Saturday, December 12, 2009
peppermint squareos

DUDE. Homemade oreos. Like whoa. DO IT. These are the best cookies I've made in a really long time. You'll be sad if you don't make them.
And you know what's a lot easier than cutting circles of dough? Cutting squares.
 Peppermint Squareos
Adapted from The Essence of Chocolate and Joy the Baker
For the Cookies:
3/4 cup sugar
1 1/2 cup plus 3 tbs all-purpose flour
3/4 cup plus 1 tbs unsweetened cocoa powder
1/2 tsp baking soda (or baking powder)
1 1/2 tsp salt
1/2 tsp instant coffee
15 tbs unsalted butter (2 sticks - 1 tbs!), cut in 1/2-in cubes, at room temperature (this is important)
For the Filling:
1/2 cup heavy cream
8 ounces white chocolate, finely chopped (I did half white and dark)
1/8 to 1/4 tsp pure peppermint extract (taste your dough as you add)
Heat oven to 350 F.
In a bowl, combine the sugar, flour, cocoa powder, baking soda, salt, and instant coffee and mix. Slowly add the butter a few pieces at a time, stirring as you go. The mixture will have a sandy texture at first and then will begin to form pebble-size pieces. As soon as the dough starts to come together, stop the mixer. It will look wet, but loose. Squeeze a handful. It should hold together. Transfer the dough to a board and shape the dough into a block about 5 by 7 inches. Cut the block into two pieces. Bake for 10-15 minutes, pending on the size of your cutouts. Remove from the oven and cool on the sheets for 2 to 5 minutes. They'll be too soft to move straight from the oven. Transfer the cookies to a cooling rack and let cool completely. Transfer the filling to a small bowl and let stand until room temperature. You’ll need the filling thicker to assemble the cookies, so cover the filling and place it in the refrigerator for 30 minutes or an hour, until a thick consistency is reached. If the filling hardens too much, it can be rewarmed in the microwave for a few seconds. To Assemble the Cookies: Transfer the filling to a pastry bag fitted with a 1/4-inch plain tip. Or just spread it on with a knife. Pipe or spread filling in the center of each upside down cookie. Gently, using your fingers, press the cookies together until the filling comes just to the edges. I had plenty of leftover filling for bowl licking enjoyment.
Roll the dough straight from the mixer. The dough becomes hard to work with if chilled.
One at a time, roll each block of dough between two pieces of lightly floured parchment paper until about 1/8-inch thick. Use a cookie cutter or a knife to cut out your shapes of choice.
Place on baking sheet lined with parchment paper. These cookies don't spread.
For the Filling:
In a small saucepan, bring the cream to boil over medium heat. Remove from the heat and add the finely chopped chocolate and peppermint extract. Make sure all the chocolate is covered by the cream. Let stand for 1 minute (this is important), then whisk the white chocolate until completely melted.
Place half of the cookies upside down on a work surface. Whip the filling lightly with a whisk to loosen it. It will lighten in color and fluff up. Don’t overwhip or the filling may begin to separate.
Tuesday, November 17, 2009
bluebottle coffee
 I know this is an obvious fact for the hipster coffee-drinking residents of San Francisco, but I just wanted to confirm that Bluebottle Coffee is really, really good.
They do the whole organic microroaster thing and make cool designs in your foam, and you know what? It really is better. Mmmmm...
chocolate chip banana bread
 I was never a fan of bananas until my discovery of banana streusel muffins. Banana bread was a complete revelation. How could some dry, sandy "fruit" turn into something so moist and decadent?
Now banana bread is my backup recipe when I need something fast and delicious. Despite my infrequent blogging habits, I've written about 3 variations already. It's a bread! It's a cake! It's a muffin! Check it out:
Your Mom's Banana Bread
Candied Walnut Banana Cake
Blackberry Banana Bread
Not convinced? Maybe you need chocolate to make it better. Throw in some chocolate. Maybe some pumpkin seeds. Bake for awhile. Now you have chocolate chip banana bread. Yeahhh.
Friday, November 6, 2009
Monarch
Housed in the funky, kitschy boutique Hotel ZaZa in the Houston museum district, Monarch seemed liked a promising choice for some bachelorette/girls' night dining.
When the food was on, it was addictively fantastic. Let's go over the highlight reel:
Deconstructed ahi roll: A tower of Ahi tuna tartare, crab ceviche, avocado, sushi rice, and peppery dressing. What's not to love? Perfectly balanced proportions and flavors. Easily my favorite dish of the night.

Scallops with fancy garlic mashed potatoes, corn pudding, and red pepper beurre blanc. Would all my food taste this luscious and velvety if I cooked with pools of butter? You bet there was nothing left on the plate.
 We also tried the salmon with honey chipotle polenta which was just oddly sweet like plums, and an awful creme brulee that was served cold and more akin to curdled cheesecake. HOWEVER, a complaint yielded possibly the best chocolate cake I've ever had.
Decadent chocolate cake tends to result in this super-rich indistinguishable chocolate-in-chocolate-on-chocolate-over chocolate monstrosity. But not this one - fudgy cake layered with smooth, creamy, oh so lickable dark chocolate fondant. And that's it. We found ourselves inadvertently grazing on fork after forkful even though we were delightfully stuffed.
Overall, what Monarch gets right, it really rocks. See and be seen with the ahi, scallops, and chocolate cake. The cocktails were nice, too.
red velvet black and white cookies
 Black and white cookies? Plus red velvet cake? In cookie form? You know it's gotta be your birthday. If you drew a Punnett square for these two fine pastries, this would be a prime example of co-dominance. This recipe makes exactly what you think it does - if you are a purveyor of red velvet or black & white cookies, you need to get on this. RIGHT NOW.
After a bowl of botched frosting and red food dye everywhere, I mailed off a stack of these to my old roommate. HAPPY BIRTHDAY! I hope I put enough bubble wrap in the box.
 Here is approximately what I did, adapted from Joy the Baker and good ol' Rachel Ray.
Red Velvet Black & White Cookies
Makes 10 big ol' cookies
1 1/4 cup all-purpose flour
1 T cocoa powder
1/2 tsp salt
1/2 tsp baking soda (I used baking powder and it was fine)
5 T butter, at room temperature
3/4 cup sugar
1 egg
1 T red food coloring
1 tsp vanilla
1/2 cup buttermilk
Vanilla Glaze1 cup powdered sugar
1-2 T milk
1/2 tsp vanilla
2 tsp butter, melted
Chocolate Glaze
4 ounces semi-sweet chocolate
3 T butter
1 T honey
Preheat oven to 350 F. Line baking sheet with parchment paper. Mix together flour, cocoa, baking soda and salt.
In separate bowl, mix butter with sugar until fluffy. Beat in the egg, food coloring and 1 tsp vanilla. Beat in the flour mixture alternately with the buttermilk until smooth.
Place 1/4-cup scoops of batter 2 inches apart of the prepared baking sheet, spread the batter out with a butter knife, about 1/4-inch thick. Bake until a toothpick inserted in the center comes out dry, 12 to 15 minutes. Let the cookies sit for 5 minutes, then transfer to a rack to cool.
Make the glazes:Whisk together the powdered sugar, melted butter, 1/2 teaspoon vanilla extract, and 1 to 2 T milk. Add milk slowly till glaze reaches smooth, easily spreadable consistency of your liking.
For the chocolate, melt butter and chocolate in a microwave for about 1 minute. Add honey and stir until smooth. If it's a bit too liquidy and you're ready to get decorating, pop it in the fridge for a little while.
Thursday, October 22, 2009
sambussas with peach chutney
Way back in August, at the end of watermelon season, I decided I needed a birthday biking supper safari watermelon research victory dance party. If you're gonna party, go big. Let's focus on the supper safari bit: with a handful of loving friends, you roam the town, going from house to house for a different course. If you're really lucky and have the best cohorts you could ask for, it will end with a dessert course chocolate fountain dance party.
 But I digress! For the appetizer stop I made a variant of sambussas, Ethiopian lentil turnovers usually deep fried. The lentils are cooked with fragrant spices, and offer a texture and flavor you'd almost swear was meat. I know the photo is unflattering, but it's hard to photo-document when you're busy stuffing your face.
Deep frying sends my epidermis into hiding, so I wrapped the filling in sheets of phyllo and baked them instead, giving the sambussas an incredibly light, crunchy texture. I served these up with an Indian inspired peach chutney, aka mashing peaches in a pot, that complimented the heat and savoriness of the filling far better than I could have anticipated. It's a light and hardy, sweet and savory experience all in one. Bake them ahead of time, then crisp up in the oven for a few minutes before dishing.
The recipe has a couple steps, but be not afraid! Deliciousness can be yours!
Supper Safari Sambussas
Inspired by Sundays at Moosewood Restaurant and dinner at Queen Sheba
1 cup brown lentils
1 green bell pepper, diced
1 medium onion, diced
2 cloves garlic, minced
½ tsp cayenne pepper
1 tsp cinnamon
2 tsp sweet Hungarian paprika
1 tsp grated fresh ginger
1 tsp ground coriander
salt and pepper
1 package phyllo dough (whole wheat, even!)
olive oil
4 yellow peaches
1 tsp grated fresh ginger
Juice and zest of one lime
½ c dried cranberries
Make the filling:
Rinse lentils and bring to a boil in 3 cups water. Reduce heat, cover, and simmer 45 minutes, or when lentils are tender. Meanwhile, saute onions, garlic, and bell pepper in olive oil until the onions are translucent. Add the spices and cook for 3 minutes more. Add the cooked lentils and season with salt and pepper. The longer this sits, the better it tastes!
Make the sambussas:
Take one sheet phyllo dough and brush with olive oil. Place 2nd sheet of phyllo on top and brush with oil. Cut into squares big enough to make a turnover. Honestly, I couldn’t figure out an efficient shape and wrapping method, and just went free style here with all sorts of odd shapes. I think it makes them look rustic.
Fill with some filling and attempt to wrap. Transfer to a parchment paper lined cookie sheet and brush with oil. Repeat a whole bunch, then pop in the oven at 350F till they’re toasty and pale brown, maybe 20-30 minutes. The insides are cooked, so there’s a big window of doneness!
Make the chutney:
While the goods are in the oven, peel and chop up some peaches, then throw them in a pot. Over medium heat, mash them up with a potato masher or some forks, add the ginger, lime juice and zest, and cranberries. Stir around till it reaches the consistency of your choosing. When it’s safely cool, serve it all up!
Wednesday, October 7, 2009
my anti-watermelon
This is your free time: This is your free time on watermelons:
 Gastronomic adventures of the microbiological, safari dance party, Tuscan, and Houston kind coming soon.
 This is your free time on watermelons:
 Gastronomic adventures of the microbiological, safari dance party, Tuscan, and Houston kind coming soon.
Saturday, August 15, 2009
buttermilk biscuits
Scene 1
I make people eat watermelon in the name of science as part of my research. To ensure my trained watermelon eating machines keep coming back for more, we like to create a little positive feedback by giving them treats at the end of every session.
If you may have noticed, my baking skills excel in the sweet area. But who wants to eat a cookie (or anything, really), after I just stuffed you full of 10 watermelon slices? My usual dulcet approach was failing.
Exuent.
Scene 2
Oh, snap! I forgot I have to run a sensory panel tomorrow! What can I feed the buggers? Also, I haven't been grocery shopping in 2 weeks.
Scene 3
When you have 'nothing' left in your house, you probably still have milk, vinegar, flour, and butter (just barely).
Enter biscuits.
Nothing you have not, but buttermilk biscuits you do!
Queue trumpet fanfare. Disaster averted.
 ---
---
And so the drop biscuits were born, meaning no rolling out and cutting dough, and exactly one bowl got dirty. Mine came out a touch more crumbly than I'd prefer, but I should have known better and added a touch more milk when I thought the dough looked dry. Either way, still pretty good heated up with honey!
Buttermilk Biscuits
From Bon Appetit | Oct 2002
3 cups all purpose flour
2 tablespoons sugar
4 teaspoons baking powder
1 teaspoon salt
1 teaspoon baking soda
3/4 cup (1 1/2sticks) chilled unsalted butter, cut into 1/4-inch pieces
1 cup buttermilk
Preheat oven 425°F.
Whisk flour, sugar, baking powder, salt and baking soda in large bowl to blend. Using fingertips, rub 3/4 cup chilled butter into dry ingredients until mixture resembles coarse meal. Add buttermilk and stir until evenly moistened.
Using 1/4 cup dough for each biscuit, drop biscuits onto baking sheet, spacing 2 inches apart. Bake until biscuits are golden brown on top, about 15 minutes. Cool slightly. Serve warm.
I make people eat watermelon in the name of science as part of my research. To ensure my trained watermelon eating machines keep coming back for more, we like to create a little positive feedback by giving them treats at the end of every session.
If you may have noticed, my baking skills excel in the sweet area. But who wants to eat a cookie (or anything, really), after I just stuffed you full of 10 watermelon slices? My usual dulcet approach was failing.
Exuent.
Scene 2
Oh, snap! I forgot I have to run a sensory panel tomorrow! What can I feed the buggers? Also, I haven't been grocery shopping in 2 weeks.
Scene 3
When you have 'nothing' left in your house, you probably still have milk, vinegar, flour, and butter (just barely).
Enter biscuits.
Nothing you have not, but buttermilk biscuits you do!
Queue trumpet fanfare. Disaster averted.
 ---
---And so the drop biscuits were born, meaning no rolling out and cutting dough, and exactly one bowl got dirty. Mine came out a touch more crumbly than I'd prefer, but I should have known better and added a touch more milk when I thought the dough looked dry. Either way, still pretty good heated up with honey!
Buttermilk Biscuits
From Bon Appetit | Oct 2002
3 cups all purpose flour
2 tablespoons sugar
4 teaspoons baking powder
1 teaspoon salt
1 teaspoon baking soda
3/4 cup (1 1/2sticks) chilled unsalted butter, cut into 1/4-inch pieces
1 cup buttermilk
Preheat oven 425°F.
Whisk flour, sugar, baking powder, salt and baking soda in large bowl to blend. Using fingertips, rub 3/4 cup chilled butter into dry ingredients until mixture resembles coarse meal. Add buttermilk and stir until evenly moistened.
Using 1/4 cup dough for each biscuit, drop biscuits onto baking sheet, spacing 2 inches apart. Bake until biscuits are golden brown on top, about 15 minutes. Cool slightly. Serve warm.
Thursday, July 9, 2009
cinna-brunch!
After puttering around in many an airport with the smell of Cinnabon permeating the air, it was time to answer the craving with a Sunday cinna-brunch.

I've had this long time fear of making cinnamon rolls. Something about yeast and me with a rolling pin. I've had a recipe bookmarked for years, but never went through with it. Fortunately the baker scientist in me finally won over and I made TWO versions of cinnamon rolls for direct comparison. If you're gonna cinna-brunch, you might as well go big.
And what did I find out? Cinnamon rolls are fun and kinda easy to make. And if you make two batches you have 24 rolls. Which means you just made up to 24 friends.
I went with a straightforward recipe with a buttery dough filled with cinnamon and brown sugar, and a fancier one from Saveur that involved folding cream cheese into the dough (a la croissant style), maple syrup, and cloves.
The verdict? Anything smeared with cream cheese frosting straight out of the oven is kinda amazing. Both were deliciously soft, fluffy, and all-over-your-face sticky. The Saveur one was considerably more work, but not actually better - the fancy touches didn't really stand out. Cinnamon rolls aren't a subtle food, after all.
Get the recipe
Sunday, June 14, 2009
research
 Researcher translation #23: I'm going to a conference = I'm renting a car and going beach hopping on the research slush fund. This is how I learned about my new found love of chocolate covered frozen bananas.
They dip frozen bananas in melted chocolate on the spot, then roll it in your choice of toppings before the chocolate hardens. I opted for everything. Why hold back?
 Chocolate-covered frozen banana rolled in chocolate and rainbow sprinkles, peanuts, walnuts, almonds, Oreos, and Heath bar. Hooray, summer!
Saturday, June 13, 2009
spritely ginger spice cookies
 "Only once the cookie jar is full can the brain be filled." - fortune cookie
Okay, I made that up, but it's true. I needed these cookies to study, paper write, and generally function. True story. When your pantry is plundered after a week of deadlines, these ginger spice cookies are the open arms you turn to.
The cookies are sneakily seductive, showcasing a melange of fresh ginger, molasses, and cardamom. A little bit of cocoa powder melds the spices together. Fattened up with oil and yogurt, they bake up light and soft.
For a fancy schmancy touch they are topped with coarse salt and rolled in rapadura, an unrefined, ungranulated cane sugar. It looks a bit like sand, has a slightly fruity smell, and tastes just barely sweet, practically unrecognizable as anything we usually perceive as sugar. The most fascinating part is that it leaves an almost effervescent feeling in your mouth. The sensation of lightness complemented the softness of the cookie really well. Sucanat is a very close, slightly more common rapadura analog. If you see some, I definitely suggest trying it!

Spritely Ginger Spice Cookies
Rather adapted from Prudence Pennywise
1/2 cup canola oil
1/4 cup yogurt
1 cup granulated sugar
1/4 cup molasses
1 tsp fresh ginger, grated
1 egg
2 cups all purpose or whole wheat flour
¼ cup cocoa powder
2 ½ tsp baking soda
1 tsp cinnamon
½ tsp cardamom
½ tsp cloves
¼ tsp salt
rapadura
coarse salt
Preheat oven 350 F.
Beat together oil, yogurt, sugar, molasses, and ginger. Next, beat in the egg. Hooray emulsifications!
In a separate bowl, mix all the dry ingredients together. Slowly add this flour mixture into the oil mixture and stir. The dough will be pretty sticky, so chill in the fridge for at least 30 minutes.
Scoop out ping pong sized dough balls, roll them in rapadura, and top with a few grains of coarse salt. Bake approximately 12 minutes - shorter if you want a softer cookie, longer if you like it crunchy.
Tuesday, May 26, 2009
blackberry banana bread

Last week I took a glorious four day weekend to Seattle, but in order to get there I baked this bread up to swap for airport transportation services. This bread is gorgeous with the red and purple of the berries and green flecks of pumpkin seeds. The blackberries give a nice tart bite to the richness of banana bread, and couldn't be easier to mix up.
Blackberry Banana Bread
8 tbsp unsalted butter
3/4 cup sugar
2 eggs
½ cup plain yogurt
1 tsp vanilla extract
1½ cup whole wheat flour
1 tsp baking soda
1 tsp salt
1 tsp cinnamon
½ tsp nutmeg
½ cup toasted pumpkin seeds
1 cup blackberries
Preheat oven to 350°F. Butter a loaf pan.
Cream the butter and sugar until light and fluffy. Add the eggs and vanilla, beating well. Mix in yogurt.
In another bowl, mix dry ingredients together and add to butter mixture. Blend well. Add bananas. Mix, mix, mix. Stir in the pumpkin seeds. Gently fold in blackberries and pour into the pan.
Bake 45-60 minutes, until the middle springs back when you push down on it. If it's getting too brown and it's not done, cover the loaf with foil and keep baking.
Woot!
Monday, May 4, 2009
basic brownies
I know brownie baking is very much a practice of personal preference, and there's no pleasing everyone. I'm a corner piece gal myself. We made a double batch for the Food Championship aftermath lunch, and they were just the right amount of fudgy and cakey to please most palates. I suppose the palate also adapts in the face of free brownies, but I think they were pretty solid by any standard.
This recipe uses one of my favorite baking with chocolate tricks by incorporating coffee into the batter. Nevermind that I've never worked a coffeemaker before and had to ask one of my cohorts to do it for me. Grad school is about discovery, right? The astringency of the brew balances the richness of the chocolate and adds a nice warm undertone of something good you can't quite put your finger on. The use of brown sugar instead of the standard white is a nice touch. This recipe happens to be vegan, too.
The brownies are fairly sticky, so I highly recommend lining your pan with parchment paper, and maybe spraying it, too.
 Basic Brownies
Adapted from a source I can no longer find
1 1/2 c all-purpose flour
1/2 c cocoa powder
1 1/2 c brown sugar
3/4 tsp baking powder
1 1/2 tsp baking soda
1 tsp salt
3/4 c coffee
3/4 c soy milk (I use unsweetened)
1/2 c canola oil
3/4 c semisweet chocolate chips
Preheat oven 350 F.
Mix all the dry ingredients (brown sugar included) together. Combine the coffee, soy milk, and canola oil. Add the liquid to the dry ingredients while stirring. Throw in the chocolate chips or any other brownie flair of your choice.
Pour into parchment lined 9x9-in pan. Bake for about 25 minutes, or to the fudginess of your liking.
This recipe uses one of my favorite baking with chocolate tricks by incorporating coffee into the batter. Nevermind that I've never worked a coffeemaker before and had to ask one of my cohorts to do it for me. Grad school is about discovery, right? The astringency of the brew balances the richness of the chocolate and adds a nice warm undertone of something good you can't quite put your finger on. The use of brown sugar instead of the standard white is a nice touch. This recipe happens to be vegan, too.
The brownies are fairly sticky, so I highly recommend lining your pan with parchment paper, and maybe spraying it, too.
Basic BrowniesAdapted from a source I can no longer find
1 1/2 c all-purpose flour
1/2 c cocoa powder
1 1/2 c brown sugar
3/4 tsp baking powder
1 1/2 tsp baking soda
1 tsp salt
3/4 c coffee
3/4 c soy milk (I use unsweetened)
1/2 c canola oil
3/4 c semisweet chocolate chips
Preheat oven 350 F.
Mix all the dry ingredients (brown sugar included) together. Combine the coffee, soy milk, and canola oil. Add the liquid to the dry ingredients while stirring. Throw in the chocolate chips or any other brownie flair of your choice.
Pour into parchment lined 9x9-in pan. Bake for about 25 minutes, or to the fudginess of your liking.
Sunday, May 3, 2009
rice krispy treats
 Rice Krispy treats are possibly one of the few retro childhood pleasures that taste just as good when you're older. I will admit I still drink Nesquik.
Follow the directions straight off the box, and you'll have puffed sticky goodness in 10 minutes flat. For a slightly gooier, sticky treat, throw in an extra handful of marshmallows. A handy (ha ha!) trick I learned from my baking maven classmate is to wet your hands before patting down the melted marshmallowy cereal mix in a pan. It's allll sugar, so wet hands won't stick.
P.S. 10 oz marshmallows = 4 cups
Sunday, April 5, 2009
watermelon casualty #1
 In attempt to start research strong, I went out today in search of watermelon. Upon returning to lab to drop off the cucurbitaceae cornucopia, this guy rolled out of the trunk and hit the pavement. Bad sign of things to come? This could be a lonnnng summer...
At least the fault line looks pretty cool. "Failure analysis of seedless watermelon varieties" sounds like a much more interesting thesis...
Friday, April 3, 2009
bran-tastic!
 I'm a social pastry eater like some people are "social drinkers." Yeah, right. I thought I might diverge the pastry habit with warm bran muffins in the morning. Instead, I've just created a sweet, sweet rationalization mechanism for more pastry. In fact, I don't know what could justify an afternoon peach cobbler better than wholesome fiber and guilt-free baking.
This recipe from Farmgirl Fare seriously puts the bran in bran muffin by mixing up lots of wheat bran, oat bran, yogurt, and honey, for a light, moist breakfast affair.
Remarkably, I followed the recipe as written, and threw in a handful of currants with yummy results. Consume smeared with peanut butter or honey. If bran isn't your number one breakfast choice, consider the banana or berry variations. This batter makes a wonderful base for lots of fun variations and might change your mind about the less decadent cousin of the streusel topped blueberry muffin.
Bake up a batch of these and feel bran-tastic about eating that brownie!
Monday, March 30, 2009
the lake house burgers
 "The Lake House" is quite the euphemism for " the burger place beside little pond dug out in the middle of downtown Houston," but I digress. Located in Discovery Green, the new corporate logo-ed green space (kudos for trying), the interior channels a more austere Cafe Express. You'd expect some typical stylized cafe sandwiches and menu board featuring no less than 5 French words, but then you'd be wrong.
The Lake House provides some damn tasty burgers. And sweet potato fries. And basil lemonade. And did I say burgers? Medium rare actually comes out medium rare on a toasty white bun. The sweet potato fries are crisp and plentiful (take note, Ruggles!). The basil lemonade is a potent, but delicious bonus. Order a mango iced tea and mix yourself a few Arnold Palmers.
We also got a black bean veggie burger, which was a little crisp on the outside, keeping its form as you bit through it. Borderline dry, but nothing a little cock sauce couldn't fix, which they actually have!
One small quibble is the box claims "all our packaging is compostable" and there's a little sign boasting their compostable ways. Seeing only the trash to toss our box in, we inquired and found out that actuallllly they don't.
Best part of coming here? When you're done you get to play in the fountains outside!

Sunday, March 15, 2009
happy pi day!
Is it any surprise that I would make a pie in honor of Pi Day? We celebrated in style with fresh strawberry and apple pies. A night with mathematicians and double-crusted goodness - what more could a girl want (seriously)? What's your flavor?


Saturday, March 14, 2009
heartz
 Cookies to be wrapped up in brown paper packages tied up with string... aka IKEA tupperware and packing tape. But that's not nearly as romantic.
Make someone's day and put a little homemade luv in the mail. Above are rugelach (read ruge-love), chai snickerdoodles, and vegan toasted oat cookies.
Nerd Note: If you're going to mail cookies, choose ones of similar moisture content since their water will equilibrate in the package during shipping. In other words, don't pack crisp and chewy cookies together.
Wednesday, March 4, 2009
peanut butter banana cream pie
 The phrase 'cream pie' sounds so dated and evokes visions of jello pudding mix poured into premade pie crust, possibly available a la carte in the school cafeteria. That's a pretty harsh sentence for something as delicious as pie.
This peanut butter banana cream pie does absolutely everything right to dispel any misconceptions. Ripe bananas are folded into luscious, velvety pastry cream and poured into a graham cracker crust layered with dark chocolate and fresh ground peanut butter, then topped with fresh whipped cream.
For those of us more technically inclined, this pie is a lot of fun to make. You get to hit things, double boil things, whip hot things, whip cold things... I swear it's fun, and you feel like a fancy cook.
For pastry cream success, there are two tricks I learned not usually included in recipes:
1. Thoroughly whisk the sugar and cornstarch together before adding any wet ingredients. They help keep each other from clumping, keeping lumps out of your cream.
2. Add a little bit of the unheated milk to the egg yolks going into said sugar/cornstarch mixture. Many recipes call for beating just the egg yolks, sugar, and cornstarch together, but sometimes this isn't enough moisture to realistically mix them. A little milk will make your life much easier.
I followed this well written recipe as printed by Joy the Baker. The bananas and whipped cream balance the richness of the pastry cream, while the dark chocolate and peanut butter balance the sweetness. Yeah, it was really good. The only quibble I had was after chilling the pie, the chocolate layer was hard and difficult to cut through. In the future I might mix in a little heavy cream with the melted chocolate to make a sort of spreadable ganache layer. Also, it says that the pastry cream mixture will take about 6 minutes to thicken up. For me, it was ready in more like two.
This is pie fit for birthday celebrations!

Thursday, February 26, 2009
chocolate chip cookies

After many adventures into cookies needing fancy things like cocoa nibs and cardamom, pastry cutters and microplane graters, and tofu and toasted oats, I felt a calling to a) procrastinate, and b) make an unfussy cookie.
Unfussy cookies I did make, and let me tell you how much sweeter procrastination is with warm chocolate chip cookies in hand. The next time you need to do work, I suggest you have a cookie instead.
Ironically, instead I'm going to post about this fussy chocolate chip cookie recipe from the New York Times. If you recall the bacon cookies from last summer, these are actually those cookies. They're notable because I actually followed the recipe EXACTLY as printed. As a scientist you'd think I'd see the value in baking a control, but as a baker I'm too smart for my own good and always have to meddle. Was it worth it?
There are four notable things about this recipe:
1. It uses odd amounts of ingredients. 2 cups minus 2 tablespoons cake flour? This is because the recipe converts ingredients by weight into volume. Notice that it calls for 8.5 oz of bread and cake flour, but by volume are different by almost 1/3 cup. Theoretically this would give you a more consistent cookie every time you make it.
2. It uses really good quality chocolate. See those huge melty disks of chocolatey-ness in the photo? Hershey's chocolate chips can't hold a candle.
3. You're supposed to refrigerate the dough for 24-36 hours to improve the crumb, shape, and color of the final cookie. I used to never chill dough, but this recipe convinced me that at least a little waiting is worth it. However, 24 hours seems a bit much to ask when warm cookies are at stake - I'd say bake a few off immediately to tide you over, then chill the rest for at least an hour or two.
4. The cookies are finished with a sprinkle of coarse salt, playing up on the ever popular sweet and savory.
Conclusion? Quality ingredients and chilling dough pays off, but don't let fussy recipes get in your way of enjoying fresh baked cookies. The recipe on the bag of Toll House chocolate chips is pretty good, too...
Saturday, February 21, 2009
alone time citrus bars

Sunshine and citrus groves on a plate - how could you not be happy eating these? You're going to need some alone time with these.
There are a couple touches that make these way better than the standard super sweet, fluorescent yellow lemon bars you usually see. First, the toasted nuts and wheat germ round out the flavor of the crust and give the bar a bit more texture. Then there's the filling. Oh, the filling. It comes out addictively smooth, bright, and creamy like pastry cream. None of this gooey jaundiced gel business here. Finally, this recipe is easy. There's no frou frou curd making or straining through sieves. Just prepare a crust and pour the filling in.
Any combination of citrus works, really. Just adjust the sugar if you're using more sweet or tart fruits.
Alone Time Citrus Bars
Adapted from Martha Stewart’s Baking Handbook
Crust
1 ¼ cup all-purpose flour
¼ cup wheat germ
1 cup chopped pecans, toasted
¼ cup confectioner’s sugar
¾ tsp salt
1 ½ sticks unsalted butter, frozen and cut into cubes
Filling
4 large eggs
1 ¼ cups granulated sugar
Juice of one lemon, lime, tangerine, orange, and grapefruit
1 tsp zest each from lemon, lime, tangerine, orange, and grapefruit
1/3 cup all-purpose flour
Preheat oven to 350 F. Prepare crust by whisking everything but the butter together. Using a pastry blender or two knives, cut in the butter until the largest pieces are pea sized. Press mixture into bottom and up sides of an ungreased 11x14-in baking pan. Bake until golden, about 20 minutes.
Meanwhile, prepare the filling by whisking together the eggs, sugar, and flour until combined. Whisk in juices, zest, and salt. Pour filling into crust. Bake until center is set about 20 minutes. Enjoy warm or chilled.
Thursday, February 19, 2009
jab chae

Jab chae is the Korean take on glass noodles with veggies, playing up on the sweet and savory with a soy and mirin based sauce. The sweet potato noodles used are slippery and translucent, but thick like spaghetti. The dish can endlessly be adapted to fit what's in your fridge. Forgo your usual Asiany stir-fry standby and give this a try. Leftovers are also delightful cold.
Protein and veggies are cooked separately, then tossed all together at the end with the jab chae sauce. Cooking each component one at a time seems like a pain, but your noodles will be too watery by the end if you try cooking everything at once. Each component only takes a few minutes anyway. If your produce deviates from the recipe, split them up by cooking time. ie - cook carrots, celery, and onion together because they soften at about the same rate. Below is a fairly standard version of the recipe.
Jab Chae
4-5 oz sweet potato vermicelli (tang myun), soaked in hot water per package’s directions
½ medium onion, sliced
3 cloves garlic, minced
1 scallion, sliced
2 carrots, cut into strips
1 bunch spinach, cut into thirds
2 cups fresh shiitake or button mushrooms
¼ lb chadolbaegi (thinly sliced beef)
½ kamaboko cake (Japanese fish cake), thinly sliced
sesame seeds
fresh ground pepper
Jab Chae Sauce
3 tbsp soy sauce
3 tbsp sesame oil
3 tbsp mirin
1 tbsp sugar
6 tbsp water
Mix all components of jab chae sauce together. Set aside. Set pan on medium high heat. Coat pan lightly with oil. Pan fry chadolbaegi until cooked. Remove and put into a large bowl.
Reset pan on medium high heat. Add more oil if necessary. Cook button and shiitake mushrooms. Remove and set aside in the same bowl as the cooked beef. Repeat and cook carrots and onions. Toss thoroughly until cooked, about 3-4min. Remove from pan and set aside in the same bowl.
Repeat and cook spinach, about 2-3min. Set aside. Repeat and cook fish cake and scallions. Toss for about 2-3min. Set aside.
Finally, reset pan onto medium high heat. Lightly coat pan with oil. Add garlic, stirring for one minute, Add noodles and precooked components to pan. Add jab chae sauce. Toss. Cover for 2 min till sauce has absorbed and everything is heated through.
Generously add fresh ground pepper to taste and finish with sesame seeds.
Sunday, January 18, 2009
adobo potochop
 In Filipino cooking the word adobo refers to some sort of protein or vegetable stewed in vinegar, garlic, and pepper. What potochop means, I haven't been able to figure out, but I'll extrapolate and guess it refers to some preparation of chicken. Essentially, you cook your chicken in its own sweet, tangy marinade and it makes its own sauce. Seriously one pot cooking.
Lifted from Smarticus, here's my take on a super fast, flavorful dish. This marinade would work great with chunks of firm tofu or maybe pork.
Adobo Potochop
3 lbs. chicken parts - bone-in is nicer, though boneless cooks super fast
1/2 cup each soy sauce, rice vinegar, and water
3 tbsp brown sugar
2 bay leaves
5 (!) cloves of minced garlic
1/2 tsp of ground black pepper
lime slices
In the pot you're going to cook in, throw in everything but the chicken. Mix. Throw in chicken. Let sit for 30 minutes.
Bring to a boil, stir gently. Knock the heat down to a simmer, and cook for 45 minutes or until the chicken is tender. If using boneless meat, this is more like 15 minutes. Watch it!
If using bone-in chicken bits, you can crisp up the skin on a hot skillet with positive results. Squeeze some lime over finished product and serve up with rice.
If you want to be fancy, you can make a reduction sauce with the leftover cooking liquid. Heat a cup of the liquid and cook it down in a skillet till it thickens up and gets saucy. The thickness will cling to the meat nicely. Drizzle sauce over chicken and you're done.
Thursday, January 8, 2009
yeasted waffle love
 Yeasted waffles are pretty much the reason waffle irons were invented. Fact. Crisp on the outside, light and fluffy on the inside of course. The cornmeal gives it a nice texture, and the yeast adds that subtle complexity to the flavor that makes bread yummy. Prep time 5 minutes. There's really no reason not to bring a little waffle into your life.
P.S. - Maple syrup. Use the real stuff. It wasn't meant to be dispensed out of bottles shaped like old southern women.
Yeasted Cornmeal Waffles
2 cups milk, warm (110F)
2 tbsp melted butter
1 cup whole wheat flour
3/4 cup cornmeal (polenta)
1 pkg (2 1/2 tsp) active dry yeast
1 tsp salt
2 tbsp maple syrup
1 tbsp sugar
1/2 tsp baking soda
1 large egg
In a medium bowl, combine flour, cornmeal, yeast, salt, sugar, and baking soda. Stir in milk, butter, egg, and maple syrup. Cover with plastic wrap and refrigerate overnight.
Cook batter in waffle iron according to manufacturer’s directions. Serve with berries, toasted walnuts, yogurt, maple syrup, and/or honey.
Subscribe to:
Posts (Atom)