Pages

Tuesday, September 30, 2008

cinnamon squares

Don't be deceived by the name. This is a cake. A fairly addictive one at that, and easy to make, too. I'm all about maximum return on effort. You might think it a bit boring or flat with just cinnamon, but I assure you it's not. This cake is warm and inviting from the spice, and a touch decadent from the layer of dark, unsweetened chocolate and espresso in the middle. The original recipe called for a bittersweet chocolate buttercream frosting, but upon eating a piece warm from the oven decided that it would be ridiculously rich and overpower the nice spice, chocolate, and coffee balance. With a handful of toasted pecans tossed in, this recipe would make for an excellent coffeecake.

Generally when you bake something sweet, you start by creaming together butter and sugar, adding the wet ingredients, then adding the dry. This recipe called for something a bit reversed that I had never seen before by mixing together dry, adding eggs and milk, then finally stirring in melted butter. I was intrigued by how homogeneous a batter I'd obtain, and how that would affect the texture of the cake. I can tell you that you will be rewarded for your unorthodox approach!


Cinnamon Squares
Mostly from Dorie Greenspan's Baking From My Home to Yours

1 1/4 cups plus 2 tbs sugar
1 tablespoon plus 2 1/2 tsp ground cinnamon
1 1/2 tsp instant espresso powder (instant coffee works, too)

1 3/4 cups all-purpose flour
2 tsp baking powder
pinch of salt
3/4 cup milk
2 large eggs
1/2 tsp vanilla extract
10 tbs unsalted butter, melted and cooled
3 oz unsweetened chocolate, chopped into small chunks

Preheat oven to 350 degrees F. Butter 8" square baking pan.

In a small bowl, stir together 2 tbs sugar, 2 1/2 tsp cinnamon, and 1 1/2 tsp espresso together.

In a large bowl, whisk together flour, remaining sugar, baking powder, salt, and 1 tbs cinnamon. In another bowl, whisk together milk, eggs, and vanilla.

Pour liquid ingredients over flour mixture, and gently stir until you have a homogeneous batter. Will look lumpy, like so:
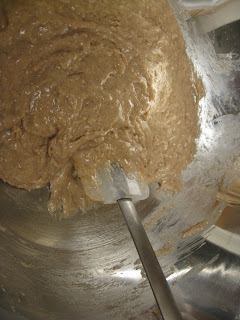
Next, gently stir in the butter just until absorbed. At first it looks like the butter will never incorporate, but keep stirring! You'll have a smooth, satiny batter when you're done.

Scrape half of the batter into the pan and smooth the top. Sprinkle the chocolate over the batter and dust with the cinnamon-sugar mixture. Cover with the rest of batter and smooth the top again.

Bake for 35 to 40 minutes, or until the cake is puffed and beginning to pull away from the sides of the pan. A thin knife or fort inserted into the center will come out clean. Let cake cool rest for 15 minutes before flipping it out onto a cooling rack. At this point you will not be able to resist any longer, so go ahead and cut yourself a piece.

roasted tomatoes


Not generally a tomato product or Italian-y food fan, but won over by the extensive array of pretty tomatoes at the farmers' market (bless your heart, Davis) I pulled out this recipe for oven-roasted tomatoes. And glory! Super-versatile deliciousness with minimal labor! So far, I have had this spread on olive bread with slices of raw goat cheese cheddar (see below), on multigrain toast with avocado (think fancy BLT), and tossed with some Italian sausage tortellini and smoked mozzarella. Yum, yes?

The original recipe calls for steeping the roasted tomatoes with raw garlic; I wondered why not roast some garlic along with the tomatoes, but stuck to the recipe anyway. The answer? At least with the varieties that I used, after several hours in the oven, they were fairly sweet in that good tomatoey way and really benefited from the brighter bite of raw garlic. The sweet, caramelized flavor of roasted garlic would have muddled the flavor balance. In conclusion? Follow directions!

To make your own Pomodori al Forno:
Heat oven to 250 degrees F.
Cut some tomatoes in half, equatorially, and remove seeds.
Get out some of that really good olive oil you've been hiding. Pour enough into a baking pan so that all your tomatoes will be sitting in some.
Place tomatoes in pan, cut side down. Sprinkle with dried oregano, salt, pepper, and sugar. Don't be scared of sugar! It helps balance the acidity.
Drizzle a bit more olive oil over the top.

Put in oven for 1 hour. Flip tomatoes. Put back in oven for 1 hour. Flip again. Put back in oven for 15-45 minutes. Remove tomatoes when they're tender, but not falling apart. A little mush is fine!

Put tomatoes in a bowl. Toss in 2 minced garlic cloves. Pour remaining olive oil over the top. The left over olive oil is gold! Let stand at room temperature 2 hours. Indulge in your tomatoes as you will, then store in fridge when done.


Thursday, September 18, 2008

inaugural banana bread


Safely relocated and mostly moved into the new digs, I woke up this morning absurdly cold and decided it was time to test out the new oven with some early morning baking.

With my beautiful red stand mixer (BEST. BIRTHDAY GIFT. EVER.) claiming some counter space, this recipe was a breeze. Sometimes banana bread turns out overly moist and sticky, but this recipe results in a slightly sweet, fairly light textured breakfast bread. The wheat flour and toasted nuts balance out the sweetness, and give the bread a little depth. Do enjoy straight from the oven, possibly with a touch of butter. Possibly have another slice for lunch as well.


Banana Nut Bread

8 tbs butter (1 stick), room temperature
3/4 c sugar
2 eggs
1 tsp vanilla extract

1 c all-purpose flour
1/2 c whole wheat flour
1 tsp baking soda
1 tsp salt
1 tsp cinnamon
1/2 tsp nutmeg

1 c mashed very ripe bananas (2-3 bananas)
1/2 c plain yogurt (or sour cream)
1/2 c chopped toasted walnuts or pecans (don't be a noob and burn them like I did)

Put on a hoodie.

Preheat oven to 350°F, butter a loaf pan. Cream the butter and sugar until light and fluffy. Add the eggs beating well.

In another bowl, mix dry ingredients together and add to butter mixture. Blend well. Add the yogurt and bananas. Mix, mix, mix. Stir in the nuts and pour into the pan. Bake 45-60 mins until the middle springs back when you push down on it. If it's getting too brown and it's not done, cover the loaf with foil and keep baking.

Try not to burn yourself as you cut yourself a piece and bask in the warmth of your kitchen.

fast fruit tarts

I had some precious handmade puff pastry left over from the bakery gig, and was looking to put it to good use. Laziness + awesome puff pastry = amazing. You'll hardly lift a finger but look like a pro because anything with puff pastry looks fancy schmancy.


What you do:

Find yourself some puff pastry better than that frozen Pepperidge Farm stuff. Consider begging your local bakery to give you some.

Cut 2 squares of thawed puff pastry out.
Top one with a few slices of apple left over from your apple pie, sprinkle with brown sugar, and dot with butter.

Top the other square with a spoon or two of peach preserves you made a few months ago because you're nuts, and some of those frozen blueberries that you picked, too. (Other jam and fruit combos work quite tastily as well. Raspberry/blackberry anyone?)

Pop in the oven at 450 degrees for 20 minutes, or until pastry is puffed and golden, and the fruit looks done. Pat yourself on the back and serve with ice cream.

summer in a jar

Recall the peach jamboree madness? Here's what happened to a mere 3 pounds of them back in June. Risking burned limbs and anaerobic bacterial growth, I had a little foray into canning. Sadly, I lost my photographic adventures of this project, but thought I aught to document it for my own edification anyway.

Peach Preserves

What you need:
4 1/2-pint mason jars and new lids, washed

3 lbs. peeled and roughly sliced peaches , about 5 cups of fruit
2/3 c sugar
1 tsp cinnamon
1 1/2 tbs. lemon juice
a very healthy splash or two of triple sec

Toss peaches, sugar, cinnamon, and lemon juice together in a bowl. Cover with plastic wrap, and let stand 3 or 4 hours. This is what we call macerating.

Place a colander in a big skillet or wok. Pour fruit and juice through colander, and let drain for 20 minutes. Remove fruit to a bowl. Measure depth of juice in pan with a chopstick.

Bring the juice to a boil over high heat, then reduce the heat enough to keep the juice boiling fairly rapidly (the surface will appear foamy with small bubbles covering the entire surface). Boil until the juice is reduced by half. This will take about 20 minutes. To test the amount of reduction, place the chopstick in the pan and see where the surface hits in relation to the original measurement. By this time, the juice has become a light, slightly glistening syrup.

Get a pot of gently boiling water going.

Add the fruit, any additional juice that has accumulated, and the triple sec. Continue cooking until the peaches begin to take on a translucent, caramelized look around the edges, and the syrup is quite thick. This will take about 15 minutes. There will be lots of splattering of screaming hot sugar, so protect your hands and arms to avoid battle scars.

Remove the mixture from the heat. Ladle the hot jam into one hot jar at a time, leaving 1/4-inch headspace. Wipe jar rim clean. Attach lid. Fill and close remaining jars. submerge jars in pot of boiling water for 10 minutes. Turn off heat and let cool till you can safely fish out the jars. Let sit on the counter overnight. Hopefully a seal should form. Nurse your burns and take pride that you'll be enjoying your peaches year-round.